The ESP32 has become one of the most popular microcontrollers in the world of IoT—and for good reason. It’s powerful, affordable, and comes with built-in Wi-Fi and Bluetooth, making it ideal for creating smart, connected devices. One of the most exciting features of the ESP32 is its ability to run as a standalone web server—no need for an external computer or server!
In this tutorial, we’ll walk you through everything you need to know to get started with ESP32 web servers using the Arduino IDE. You’ll learn what a web server is, how the ESP32 can operate in Station mode, Access Point mode, or both, and how to use these modes to build real-world applications.
To keep things fun and hands-on, we’ll build three practical projects:
- First, we’ll build a simple visitor counter using the ESP32. The idea is that the ESP32 will host a web page, and every time someone visits that page, a counter will go up by one—a great way to understand basic server handling.
- Next, we’ll move on to a more advanced project. We’ll connect a DS18B20 temperature sensor to the ESP32, and display live temperature readings on a web page. You’ll also learn how to dynamically update the readings in real time using techniques like HTTP polling and AJAX.
- Finally, we’ll build the most exciting project: controlling two LEDs over Wi-Fi. You’ll learn how to create a responsive web interface that lets you turn LEDs on and off from your browser, with the LED status instantly reflected on the page.
Sounds cool? Let’s dive in and get your ESP32 talking to the web!
What is a Web server and how does it work?
Imagine you’re at a restaurant. You sit down, look over the menu, and tell the waiter what you’d like to eat. The waiter takes your order to the kitchen, and a few minutes later, returns with exactly what you asked for. A web server works in a remarkably similar way—except instead of delivering food, it delivers websites.
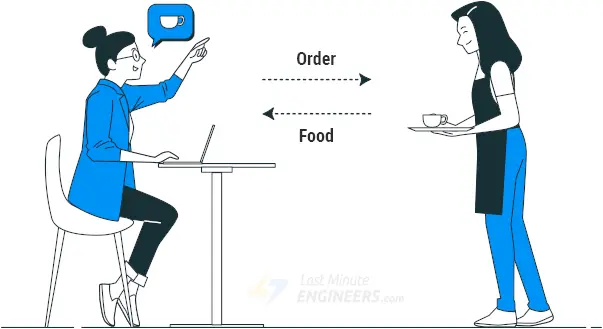
A web server is essentially a powerful computer with one main job: storing websites and delivering them to people who request them. When you type a website address into your browser or click on a link, you’re essentially placing an order with a webserver. Just like that restaurant waiter, the web server takes your request, finds exactly what you’re looking for, and delivers it back to your computer screen.
Here’s what happens behind the scenes. When you decide to visit a website—say, www.google.com—your computer first needs to find the right web server where that website lives. To do this, it uses something called an IP address.
Every single device connected to the internet, including web servers, has a unique IP address. Just as mail carriers need your exact street address to deliver a package to your house, computers need IP addresses to know where to send information on the internet.
An IP address looks like a series of numbers separated by periods, such as 74.125.130.139. While this might seem confusing at first, it’s actually a very organized system. Each number in the sequence provides specific information about where that computer is located on the internet, similar to how your address includes your house number, street name, city, and zip code.
Once your computer knows the IP address of the web server, it sends a message to that server. But computers don’t use regular language—they follow a set of special rules called HTTP, which stands for HyperText Transfer Protocol. Don’t get intimidated by the technical term; think of HTTP as simply the set of rules that computers follow when sharing websites with each other.
When your browser sends an HTTP request to the webserver, it’s basically saying, “Hello, I’m a web browser, and I’d like to see the homepage of this website.”
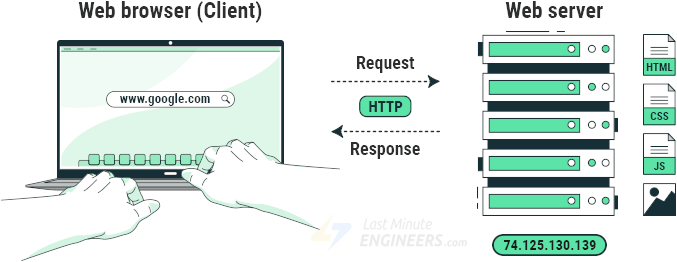
When the web server receives your browser’s request, it quickly searches through its stored files to find the webpage you asked for (like HTML documents, images, videos, and other content that makes up a website). If it finds them, the web server gathers all these components together, packages them into an HTTP response, and sends them back to your browser.
Your browser then takes that information and assembles it into a webpage you can view—allowing you to read text, watch videos, or interact with the content.
If the web server can’t find what you’re looking for, it sends back an HTTP error message, like the famous “404 Not Found” error you may have seen before.
The most amazing part? This entire process typically happens in less than a second.
ESP32 Operating Modes
One of the most useful features of the ESP32 is its ability to not only connect to an existing Wi-Fi network, but also to create its own network, allowing other devices to connect directly to it. This is possible because the ESP32 supports three operating modes: Station (STA) mode, Access Point (AP) mode, and a combination of both, known as Dual mode.
Station (STA) Mode
Let’s imagine you have a smartphone. Most of the time, your phone connects to your home Wi-Fi network, which is provided by your router. In this situation, your phone is acting like a “station” because it’s connecting to an existing network. This is exactly what STA mode, or Station mode, means for the ESP32.

When your ESP32 is in STA mode, it acts like any other device, such as your laptop or smartphone, that wants to connect to an existing Wi-Fi network. It searches for a Wi-Fi network, connects to it using the network name (SSID) and password, and then becomes part of that network.
Once connected, the router gives the ESP32 its own IP address. This IP address is really important because, with it, your ESP32 can set up a web server. This means your ESP32 can then serve web pages to all other connected devices on that same Wi-Fi network. So you could control your ESP32 project by opening a web browser on your phone or computer. Plus, if that Wi-Fi network has internet access, your ESP32 can also access information from the internet, like fetching weather data or sending information to a cloud service.
Access Point (AP) Mode
Now, let’s consider another scenario with your smartphone. Sometimes, you might turn on your phone’s “hotspot” feature. When you do this, your phone itself creates a small Wi-Fi network that your friends can connect to. Your phone is acting like a mini-router. This is similar to what AP mode, or Access Point mode, does for the ESP32.

When your ESP32 is in AP mode, it creates its own Wi-Fi network, assigning it an SSID (the network’s name), a password, and an IP address. Other devices, like your smartphone or computer, can then search for this network and connect to it using a password you’ve set. With the IP address it assigns itself, your ESP32 can serve web pages directly to all the devices that have connected to its newly created network.
AP mode is super useful when you don’t have an existing Wi-Fi network available, or when you want to create a private network just for your project. For example, if you’re building a robot in your garage where there’s no Wi-Fi, you could set your ESP32 to AP mode and connect your phone directly to it to control the robot.
Dual Mode
What makes the ESP32 particularly versatile is that it can actually operate in both modes simultaneously, which is called AP+STA mode or dual mode. In this configuration, your ESP32 can connect to an existing Wi-Fi network as a station while also creating its own access point for other devices to join. This creates interesting possibilities, such as building a device that can extend Wi-Fi coverage or create a bridge between different networks.
Example 1 – Setting up an ESP32 Web Server in Station (STA) Mode
Now that we understand the basics of web servers and how the ESP32 can operate in different Wi-Fi modes, let’s put that knowledge to use in a fun and practical project.
Project Overview
In this first project, we’ll build a simple visitor counter using the ESP32. The idea is that the ESP32 will host a web page, and every time someone visits that page, a counter will go up by one. It’s a fun way to see how many “visits” your ESP32’s web page gets!

To make this work, the ESP32 will act as a web server in Station (STA) mode, which means it connects to your existing Wi-Fi network. The ESP32 keeps track of a visitor counter internally. When you open a web browser on your phone or computer and type in a specific address (like http://192.168.1.1/ – don’t worry, your ESP32 will tell you its exact address!), your browser sends a request to the ESP32. When the ESP32 receives that request, it increases the visitor counter by one, and then sends back an updated web page to your browser, showing the new counter value. Pretty straightforward, right? Every time you refresh the page or someone else visits it, the counter goes up!

Example Code
Below you’ll find the complete code for this project. However, before you upload it to your ESP32, make sure to update two lines in the code—your Wi-Fi network name (SSID) and your Wi-Fi password. This information tells your ESP32 which network to connect to.

Once you’ve made these changes, go ahead and upload the sketch to your ESP32.
#include <WiFi.h>
#include <WebServer.h>

/*Put your SSID & Password*/
const char* ssid = "YourNetworkName";   // Enter SSID here
const char* password = "YourPassword";  // Enter Password here

WebServer server(80);

int counter = 0;

void setup() {
  Serial.begin(115200);

  Serial.println("Connecting to ");
  Serial.println(ssid);

  //connect to your local wi-fi network
  WiFi.begin(ssid, password);

  //check wi-fi is connected to wi-fi network
  while (WiFi.status() != WL_CONNECTED) {
    delay(1000);
    Serial.print(".");
  }
  Serial.println("");
  Serial.println("WiFi connected..!");
  Serial.print("Got IP: ");
  Serial.println(WiFi.localIP());

  server.on("/", handle_OnConnect);
  server.onNotFound(handle_NotFound);

  server.begin();
  Serial.println("HTTP server started");
}

void loop() {
  server.handleClient();
}

void handle_OnConnect() {
  counter++;
  server.send(200, "text/html", createHTML());
}

void handle_NotFound() {
  server.send(404, "text/plain", "Not found");
}

String createHTML() {
  String str = "<!DOCTYPE html> <html>";
  str += "<head><meta name=\"viewport\" content=\"width=device-width, initial-scale=1.0, user-scalable=no\">";
  str += "<style>";
  str += "body {font-family: Arial, sans-serif; color: #444; text-align: center;}";
  str += ".title {font-size: 30px; font-weight: bold; letter-spacing: 2px; margin: 80px 0 55px;}";
  str += ".counter {font-size: 80px; font-weight: 300; line-height: 1; margin: 0px; color: #4285f4;}";
  str += "</style>";
  str += "</head>";
  str += "<body>";
  str += "<h1 class=\"title\">VISITOR COUNTER</h1>";
  str += "<div class=\"counter\">";
  str += counter;
  str += "</div>";
  str += "</body>";
  str += "</html>";
  return str;
}
Accessing the Web Server in STA mode
After uploading the sketch, open the Serial Monitor and make sure the baud rate is set to 115200. Then press the EN (reset) button on your ESP32. If everything is working correctly, the ESP32 will connect to your Wi-Fi network and print out a message that says “WiFi connected..!” along with the IP address that your router assigned to your ESP32. You’ll also see “HTTP server started” printed in the Serial Monitor.
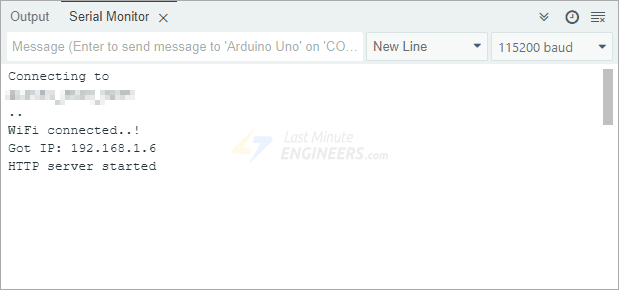
Now, grab a device like your phone or laptop that’s connected to the same Wi-Fi network as your ESP32. Open a web browser (like Chrome or Firefox) and type in the IP address that appeared in the Serial Monitor. Hit enter, and you should see a web page pop up!

This page will display the current visitor count. Try refreshing the page—you’ll notice that the counter increases each time.
Now let’s go step by step through the code so you can understand how everything works.
Code Explanation
We start by including two important libraries: WiFi.h and WebServer.h. The WiFi.h library helps the ESP32 connect to a Wi-Fi network, and the WebServer.h library allows the ESP32 to work as a web server that handles web page requests from a browser.
#include <WiFi.h>
#include <WebServer.h>
Since we’re making the ESP32 connect to your existing Wi-Fi, we define two variables to hold your network name (SSID) and password. Make sure to update these with your own network details so the ESP32 can connect.
/* Put your SSID & Password */
const char* ssid = "YourNetworkName";   // Enter SSID here
const char* password = "YourPassword";  //Enter Password here
Then we create an object from the WebServer library. We tell this object to listen on port 80. This is the standard port for web traffic, so you don’t have to type in a special port number when you visit the web page in your browser.
// declare an object of WebServer library
WebServer server(80);
We also create a simple integer variable named counter and set it to 0. This is where we’ll keep track of how many times someone has visited the web page.
int counter = 0;Inside the Setup() Function
In the setup() function, we first open a serial connection to send messages to your computer.
Serial.begin(115200);To connect to the Wi-Fi network, we use the WiFi.begin() function and give it your Wi-Fi network’s name and password.
WiFi.begin(ssid, password);While the ESP32 is trying to connect, we check its connection status using WiFi.status(). If it’s not connected yet, it waits a bit and tries again until it succeeds.
//check wi-fi is connected to wi-fi network
while (WiFi.status() != WL_CONNECTED) {
  delay(1000);
  Serial.print(".");
}
For reference, the WiFi.status() function can return the following statuses:
WL_CONNECTED: Connected to a Wi-Fi network.WL_NO_SHIELD: No Wi-Fi shield detected (not applicable to ESP32, but relevant for some Arduino boards).WL_IDLE_STATUS: Temporary status during the connection attempt after callingWiFi.begin().WL_NO_SSID_AVAIL: No networks found matching the specified SSID.WL_SCAN_COMPLETED: The network scan has completed.WL_CONNECT_FAILED: Failed to connect after all attempts.WL_CONNECTION_LOST: The connection to the network was lost.WL_DISCONNECTED: Not connected to any network.
Once the ESP32 is connected to your Wi-Fi, it gets an IP address. We print this IP address to the Serial Monitor using WiFi.localIP(). This is the address you’ll type into your browser later to access the webpage.
Serial.println("WiFi connected..!");
Serial.print("Got IP: ");
Serial.println(WiFi.localIP());
After the ESP32 is connected, we tell our web server what to do when someone visits a specific web address. We do this using the server.on() function. This method lets us say: “When someone visits this web address, run that specific piece of code.” For example, when someone visits the main page (represented by /), the ESP32 will run a function called handle_OnConnect().
server.on("/", handle_OnConnect);But what if someone accidentally types in a wrong or random web address that doesn’t exist? To handle that, we use server.onNotFound(). This tells our ESP32 that if it can’t find the page someone is asking for, it should show a “404 Not Found” error message, which is a standard way of saying “Page Not Found”.
server.onNotFound(handle_NotFound);Finally, we use server.begin() to tell the web server to start listening for incoming requests.
server.begin();
Serial.println("HTTP server started");
Inside the Loop() Function
In the loop() function, we have just one line—server.handleClient()—which continuously checks if a device (such as a browser) is trying to send a request to the ESP32. If so, the ESP32 responds using the function we defined earlier.
void loop() {
  server.handleClient();
}
Handling Web Requests
Now let’s go over those custom functions we linked to specific web addresses using server.on().
The handle_OnConnect() function is the one that gets called every time someone visits the main page of our web server. Inside this function, we do two main things: we increase our visitor counter by one, and then we send a web page displaying the updated counter value back to the browser.
To send the web page to the browser, we use the server.send() function. Although this method can take several arguments, the most common form includes three: the HTTP response code, the content type, and the actual content of the webpage.
- The first argument is the response code
200, which is the standard HTTP status code for a successful request (“OK”). - The second argument is the content type, in this case
"text/html", indicating that the server is sending back an HTML page. - The third argument is the output of the
createHTML()function, which returns a dynamically generated HTML string showing the most current visitor count.
void handle_OnConnect() {
  counter++;
  server.send(200, "text/html", createHTML());
}
If a user tries to access a page that doesn’t exist on the server, the ESP32 runs the handle_NotFound() function, which simply sends a 404 error message—just like any normal website would when you enter a wrong URL.
void handle_NotFound() {
  server.send(404, "text/plain", "Not found");
}
Displaying the HTML Web Page
Now, let’s talk about the createHTML() function. This custom function takes the current value of our visitor counter and uses it to build a complete HTML page from scratch, so the webpage you see in your browser always shows the most up-to-date count.
At the beginning of the HTML, we include <!DOCTYPE html> to tell the browser that this is an HTML5 document. We also include a <meta> tag that makes sure the page looks good on all screen sizes, like phones and tablets.
String createHTML(){
String str = "<!DOCTYPE html> <html>\n";
str +="<head><meta name=\"viewport\" content=\"width=device-width, initial-scale=1.0, user-scalable=no\">\n";
Styling the Web Page
Then we use some CSS styling to make the page look neat. This includes setting the font to Arial, centering the text, choosing colors, and sizing the counter text to be large and easy to read.
str += "<style>";
str += "body {font-family: Arial, sans-serif; color: #444; text-align: center;}";
str += ".title {font-size: 30px; font-weight: bold; letter-spacing: 2px; margin: 80px 0 55px;}";
str += ".counter {font-size: 80px; font-weight: 300; line-height: 1; margin: 0px; color: #4285f4;}";
str += "</style>";
Setting the Web Page Heading
Next, we add the main heading for the web page.
str += "<h1 class=\"title\">VISITOR COUNTER</h1>";Displaying the Visitor Counter
After that, we insert the actual counter value right into the HTML. This is how the number you see on the web page changes every time someone visits.
str += "<div class=\"counter\">";
str += counter;
str += "</div>";
Finally, the function ends the HTML by closing up all the necessary tags. Once the complete HTML code is put together, it’s sent back to the server.send() function, which then delivers it to your browser.
str += "</body>\n";
str += "</html>\n";
return str;
Example 2 – Setting up an ESP32 Web Server in Access Point (AP) mode
For our second project, we’re going to build the same visitor counter web server on the ESP32, but this time in Access Point (AP) mode.
Imagine you’re working on your ESP32 project somewhere with no Wi-Fi—like in a garage or outdoors. That’s where AP mode comes in handy. Instead of connecting to an existing Wi-Fi network, the ESP32 will create its own Wi-Fi network. Then, your phone, laptop, or tablet can connect directly to it. It’s like your ESP32 turns into a Wi-Fi hotspot!
Before you upload the code to your ESP32, you may want to change two things: choose a network name (SSID) and a password that the ESP32 will use to create its Wi-Fi network. You’ll use these details to connect your other devices to the ESP32’s network.
/* Put your SSID & Password */
const char* ssid = "ESP32";         // Enter SSID here
const char* password = "12345678";  // Enter Password here
Once you’ve set those, go ahead and upload the sketch to your ESP32.
#include <WiFi.h>
#include <WebServer.h>

/* Put your SSID & Password */
const char* ssid = "ESP32";         // Enter SSID here
const char* password = "12345678";  // Enter Password here

/* Put IP Address details */
IPAddress local_ip(192,168,1,1);
IPAddress gateway(192,168,1,1);
IPAddress subnet(255,255,255,0);

WebServer server(80);

int counter = 0;

void setup() {
  Serial.begin(115200);

  WiFi.softAP(ssid, password);
  WiFi.softAPConfig(local_ip, gateway, subnet);
  delay(100);

  server.on("/", handle_OnConnect);
  server.onNotFound(handle_NotFound);

  server.begin();
  Serial.println("HTTP server started");
}

void loop() {
  server.handleClient();
}

void handle_OnConnect() {
  counter++;
  server.send(200, "text/html", createHTML());
}

void handle_NotFound() {
  server.send(404, "text/plain", "Not found");
}

String createHTML() {
  String str = "<!DOCTYPE html> <html>";
  str += "<head><meta name=\"viewport\" content=\"width=device-width, initial-scale=1.0, user-scalable=no\">";
  str += "<style>";
  str += "body {font-family: Arial, sans-serif; color: #444; text-align: center;}";
  str += ".title {font-size: 30px; font-weight: bold; letter-spacing: 2px; margin: 80px 0 55px;}";
  str += ".counter {font-size: 80px; font-weight: 300; line-height: 1; margin: 0px; color: #4285f4;}";
  str += "</style>";
  str += "</head>";
  str += "<body>";
  str += "<h1 class=\"title\">VISITOR COUNTER</h1>";
  str += "<div class=\"counter\">";
  str += counter;
  str += "</div>";
  str += "</body>";
  str += "</html>";
  return str;
}
Accessing the Web Server in AP Mode
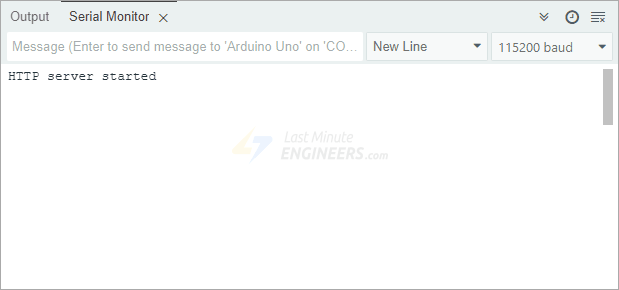
After uploading the code, open the Serial Monitor and set the baud rate to 115200. Then, press the EN button on the ESP32. If everything is working correctly, you’ll see the message “HTTP server started” in the Serial Monitor. This means your ESP32 has successfully created its own Wi-Fi network and is now ready to serve a web page.
Now, grab a device like your phone or laptop that can connect to a Wi-Fi network. Look for a new Wi-Fi network named “ESP32” (or whatever SSID you chose in the code). Connect to this network using the password you set in the code (the default in this example is “12345678”).
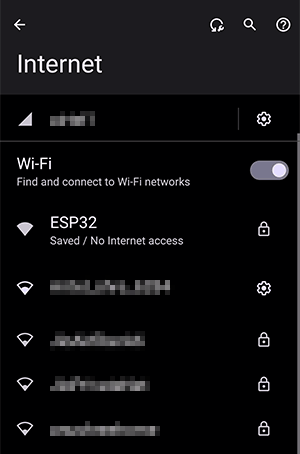
Once your device is connected to the ESP32’s Wi-Fi network, open a web browser and type 192.168.1.1 into the address bar. This is the IP address we manually set in the code for the ESP32 while configuring it in AP mode. If you change the IP address in the code, make sure to type that new address instead. Press enter, and you should see your visitor counter web page pop up, just like in the previous example.

Code Explanation
Much of this code is similar to the previous example. The main difference here is that instead of joining an existing Wi-Fi network, the ESP32 is creating its own network.
First, we set up the details for the Wi-Fi network the ESP32 will create. This includes the SSID (the network name, like “ESP32”), the password for that network, and some important IP address settings. This includes the local IP (which is the one you type into your browser to visit the web page), the gateway (usually the same as the local IP), and the subnet mask (which defines the range of addresses in the network).
/* Put your SSID & Password */
const char* ssid = "ESP32";  // Enter SSID here
const char* password = "12345678";  //Enter Password here

/* Put IP Address details */
IPAddress local_ip(192,168,1,1);
IPAddress gateway(192,168,1,1);
IPAddress subnet(255,255,255,0);
In the setup() function, we use WiFi.softAP() to start the ESP32 in Access Point mode. This is where we provide the SSID and password we defined earlier. Right after that, we use WiFi.softAPConfig() to set up the IP address, gateway, and subnet mask for this new network. A small delay is added to give the ESP32 a moment to set up its network.
WiFi.softAP(ssid, password);
WiFi.softAPConfig(local_ip, gateway, subnet);
delay(100);
That’s pretty much all that’s new for setting up AP mode! The rest of the code is exactly the same as what we discussed in the STA mode example. It includes the same setup for handling incoming web page requests, how the web page is built using HTML, and how it’s sent back to your browser.
Example 3 – Displaying Sensor Readings on an ESP32 Web Server
Let’s take things a step further. This time, we’re going to display actual data—specifically temperature readings from a sensor—right on a web page hosted by the ESP32.
Project Overview
In this project, we’ll set up our ESP32 as a web server in Station (STA) mode, just like our very first visitor counter. Whenever someone visits the main page of your web server, the ESP32 will immediately read the current temperature from the DS18B20 sensor and send back a complete web page that shows the temperature in both Celsius and Fahrenheit.
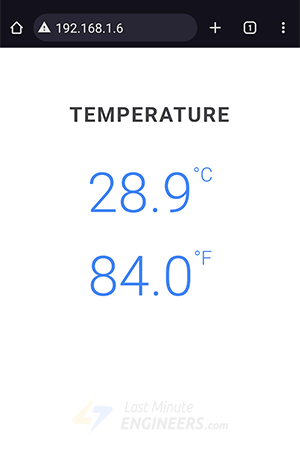
These values are freshly updated every single time someone asks for the page. So, if you want to see the latest temperature, all you have to do is refresh your web page in your browser.

And don’t worry if you don’t have this exact DS18B20 sensor; the same idea can be used to display data from almost any other sensor you might have!
Wiring the Circuit
Connecting the DS18B20 sensor to your ESP32 is simple.

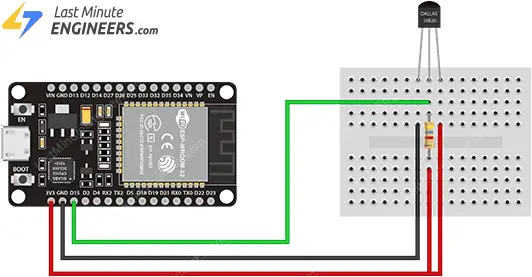
First, connect the VDD pin of the sensor to the 3.3V pin on the ESP32. Then, connect the GND (ground) pin of the sensor to any GND pin on the ESP32.
For the data connection, connect the sensor’s DQ (data) pin to GPIO 15 on the ESP32. To ensure the data signal remains stable, you’ll need to add a 4.7k ohm pull-up resistor between the DQ pin and the 3.3V power pin.
Here’s a quick reference table for the pin connections:
| DS18B20 | ESP32 | Notes | |
| VDD | 3.3V | – | |
| GND | GND | – | |
| DQ | D15 | pulled up by 4.7kΩ |
The image below shows how to connect everything.
Library Installation
The 1-Wire communication protocol used by the DS18B20 sensor is a bit complex, and writing all the code for it from scratch would take a lot of time. Luckily, there’s a special library called DallasTemperature that makes things much easier.
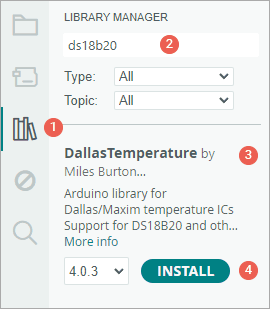
To install the library,
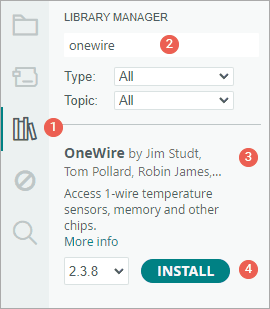
- First open your Arduino IDE program. Then click on the Library Manager icon on the left sidebar.
- Type “ds18b20” in the search box to filter your results.
- Look for the DallasTemperature Library by Miles Burton.
- Click the Install button to add it to your Arduino IDE.
To work properly, the DallasTemperature library needs to be paired with another library called OneWire.
To install the OneWire library:
- Open the Library Manager again.
- In the search box, type “onewire“.
- Find the OneWire Library and click Install.
Example Code
Copy the code below to your Arduino IDE. Just like before, you need to update two things—your Wi-Fi network name (SSID) and your Wi-Fi password.
/*Put your SSID & Password*/
const char* ssid = "YourNetworkName";   // Enter SSID here
const char* password = "YourPassword";  // Enter Password here
Once you’ve made these changes, go ahead and upload the sketch to your ESP32.
#include <WiFi.h>
#include <WebServer.h>
#include <OneWire.h>
#include <DallasTemperature.h>

// Data wire is plugged into digital pin 15 on the ESP32
#define ONE_WIRE_BUS 15

// Setup a oneWire instance to communicate with any OneWire device
OneWire oneWire(ONE_WIRE_BUS);

// Pass oneWire reference to DallasTemperature library
DallasTemperature sensors(&oneWire);

/*Put your SSID & Password*/
const char* ssid = "YourNetworkName";   // Enter SSID here
const char* password = "YourPassword";  // Enter Password here

WebServer server(80);

float Temperature;

void setup() {
  Serial.begin(115200);

  sensors.begin();

  Serial.println("Connecting to ");
  Serial.println(ssid);

  //connect to your local wi-fi network
  WiFi.begin(ssid, password);

  //check wi-fi is connected to wi-fi network
  while (WiFi.status() != WL_CONNECTED) {
    delay(1000);
    Serial.print(".");
  }
  Serial.println("");
  Serial.println("WiFi connected..!");
  Serial.print("Got IP: ");
  Serial.println(WiFi.localIP());

  server.on("/", handle_OnConnect);
  server.onNotFound(handle_NotFound);

  server.begin();
  Serial.println("HTTP server started");
}
void loop() {
  server.handleClient();
}

void handle_OnConnect() {
  // Send the command to get temperatures
  sensors.requestTemperatures();

  Temperature = sensors.getTempCByIndex(0);  // Gets the values of the temperature

  server.send(200, "text/html", createHTML());
}

void handle_NotFound() {
  server.send(404, "text/plain", "Not found");
}

String createHTML() {
  String str = "<!DOCTYPE html> <html>";
  str += "<head><meta name=\"viewport\" content=\"width=device-width, initial-scale=1.0, user-scalable=no\">";
  str += "<style>";
  str += "body {font-family: Arial, sans-serif; color: #444; text-align: center;}";
  str += ".title {font-size: 30px; font-weight: bold; letter-spacing: 2px; margin: 80px 0 55px;}";
  str += ".temperature {font-size: 80px; font-weight: 300; line-height: 1; margin-bottom: 40px; color: #4285f4;}";
  str += ".unit {font-size: 28px; vertical-align: top;}";
  str += "</style>";
  str += "</head>";
  str += "<body>";
  str += "<div id=\"temperature-container\">";
  str += "<h1 class=\"title\">TEMPERATURE</h1>";
  str += "<div class=\"temperature celsius\">";
  str += String(Temperature, 1);
  str += "<span class=\"unit\">°C</span></div>";
  str += "<div class=\"temperature fahrenheit\">";
  str += String((Temperature * 9.0) / 5.0 + 32.0, 1);
  str += "<span class=\"unit\">°F</span></div>";
  str += "</div>";
  str += "</body>";
  str += "</html>";
  return str;
}
Accessing the Web Server
After you upload the sketch to the ESP32, open the Serial Monitor and set the baud rate to 115200. Then press the EN (reset) button on the ESP32. If everything is working correctly, the ESP32 will connect to your Wi-Fi network and print out the IP address it received from your router.

Now, grab a device like your phone, tablet, or computer—anything connected to the same Wi-Fi network—and open a web browser. In the address bar, type the IP address that showed up on the Serial Monitor. You should see a clean and styled web page that displays the current temperature reading from the DS18B20 sensor.

Code Explanation
This sketch is pretty similar to the Station (STA) mode web server example we used earlier in this tutorial, but with a few important changes.
At the top of the sketch, we include two extra libraries. The first one, OneWire.h, allows the ESP32 to communicate with devices using the 1-Wire protocol—which is the protocol the DS18B20 sensor uses. The second one, DallasTemperature.h, is designed specifically to work with DS18B20 sensors and makes it easy to get temperature readings.
#include <OneWire.h>
#include <DallasTemperature.h>
Next, we define which GPIO pin on the ESP32 is connected to the data wire of the sensor. In this example, we use GPIO 15.
#define ONE_WIRE_BUS 15To get our ESP32 to communicate with the DS18B20 sensor, we do two things. First, we create a OneWire object and tell it which pin the sensor is connected to. Second, we create a DallasTemperature object and pass it the reference to the OneWire object we just created.
OneWire oneWire(ONE_WIRE_BUS);
DallasTemperature sensors(&oneWire);
Next, we set up a global variable called Temperature. This variable will store the value we get from the sensor so that we can use it later when building the web page.
float Temperature;In the setup() function, we call the sensors.begin() function. This tells the ESP32 to look for any DS18B20 sensors connected to the 1-Wire bus and sets their resolution to 12 bits.
sensors.begin();This time, when the handle_OnConnect() function is called (meaning someone has visited our main web page), the very first thing we do is call sensors.requestTemperatures() function. This tells the DS18B20 to take a new temperature reading.
Once the temperature conversion is done, we call sensors.getTempCByIndex(deviceIndex) to read the temperature from the sensor. The deviceIndex is a number that tells the ESP32 which sensor we want to read from the 1-Wire bus. Since we only have one sensor connected, we use 0 to refer to it. If you had more than one sensor, you would use 1, 2, 3, etc., depending on their order on the bus. We then take this temperature reading and store it in our Temperature variable.
Right after that, we send the web page back to the browser using server.send(), and, as before, we build that page using a custom function called createHTML().
void handle_OnConnect() {
  // Send the command to get temperatures
  sensors.requestTemperatures();

  Temperature = sensors.getTempCByIndex(0);  // Gets the values of the temperature

  server.send(200, "text/html", createHTML());
}
The createHTML() function in this example is quite a bit different from our previous ones. The basic structure of the HTML is still the same; we start with the fundamental tags like <!DOCTYPE html>, <html>, <head>, and <meta>.
String createHTML(){
String str = "<!DOCTYPE html>";
str += "<html lang=\"en\">";
str += "<head>";
str += "<meta charset=\"UTF-8\">";
str += "<meta name=\"viewport\" content=\"width=device-width, initial-scale=1.0\">";
We also include some CSS styling to make the page look attractive. The text is centered, and the temperature values are displayed in large, easy-to-read numbers. The font and colors are chosen to make everything clear and readable.
str += "<style>";
str += "body {margin: 0;padding: 0;height: 100vh;background: linear-gradient(to bottom, #ff4a73, #ffa05a);font-family: Arial, sans-serif;color: white;}";
str += ".temperature-container {text-align: center;}";
str += ".title {font-size: 18px;font-weight: bold;letter-spacing: 2px;margin: 120px 0 40px;}";
str += ".temperature {font-size: 80px;font-weight: 300;line-height: 1;margin-bottom: 30px;}";
str += ".unit {font-size: 28px;vertical-align: top;}";
str += "</style>";
To display the actual temperature readings on the web page, we take our Temperature variable (which is a number) and convert it into a string, so it can be included directly in the HTML. We format it to show only one decimal point. For the Fahrenheit temperature, we first use a mathematical formula to convert the Celsius temperature into Fahrenheit, and then we also convert that result into a string, also with one decimal point, before adding it to the webpage.
str += "<div class=\"temperature-container\">";
str += "<h1 class=\"title\">TEMPERATURE</h1>";
str += "<div class=\"temperature celsius\">";
str += String(Temperature, 1);
str += "<span class=\"unit\">°C</span></div>";
str += "<div class=\"temperature fahrenheit\">";
str += String((Temperature * 9.0) / 5.0 + 32.0, 1);
str += "<span class=\"unit\">°F</span></div>";
str += "</div>";
Finally, just like in our other examples, the function closes all the necessary HTML tags and sends the complete HTML string back to the server.send() function, which then delivers it to your browser.
HTTP Polling
In our last example, we learned how to display temperature readings on a web page. However, to get updated values, you had to manually refresh the browser. That’s okay if you only want to check the temperature once in a while. But what if you want it to update automatically and more often? Constantly pressing the refresh button isn’t practical. This is where HTTP Polling comes in.
HTTP Polling is a method where the browser automatically sends repeated HTTP requests to the web server at regular, timed intervals. In our case, that means the browser keeps asking the ESP32 for the latest temperature reading, over and over, without needing you to refresh the page.
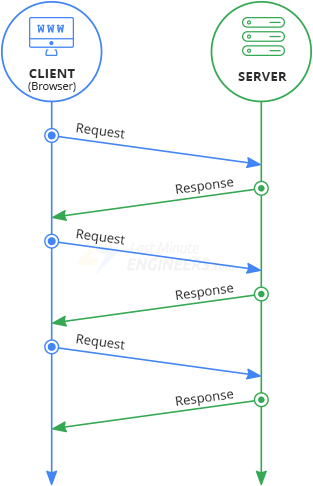
There are two ways you can implement HTTP polling:
Auto Page Refresh
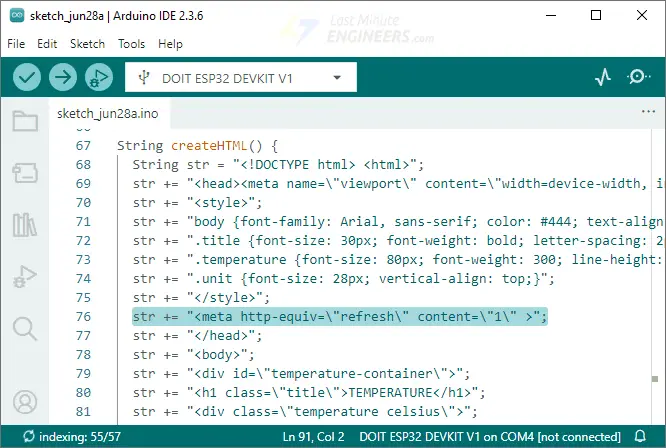
One simple way to implement this is to make the entire webpage reload itself automatically after a certain amount of time. You can do this by adding a special <meta> tag. For example, the following code refreshes the page every second:
str += "<meta http-equiv=\"refresh\" content=\"1\" >";Add this tag inside the <head> section of your web page.
Dynamically Loading Sensor Data with AJAX
While auto-refreshing the whole page works, it’s not the most efficient method—especially when only a small piece of information, like a temperature reading, is changing. That’s because every time the page refreshes, the browser requests all the resources again: the HTML, the styling (CSS), any JavaScript code, and even images. This creates unnecessary overhead for the server and can make the page slower to load each time.
A smarter and more efficient method to do HTTP polling is to use something called AJAX. AJAX stands for Asynchronous JavaScript and XML, but you don’t need to worry too much about what the letters mean. What’s important is that AJAX lets your web browser request only the specific piece of information it needs—like just the temperature reading—without reloading the entire page. The rest of the web page stays exactly the same, and only the part showing the temperature gets updated. This method is faster, reduces server overhead, and gives a smoother experience.
Here is the AJAX script that we’ll be using.
str += "<script>";
str += "setInterval(loadDoc, 1000);";
str += "function loadDoc() {";
str += "var xhttp = new XMLHttpRequest();";
str += "xhttp.onreadystatechange = function() {";
str += "if (this.readyState == 4 && this.status == 200) {";
str += "document.getElementById(\"temperature-container\").innerHTML = this.responseText;";
str += "}";
str += "};";
str += "xhttp.open(\"GET\", \"/\", true);";
str += "xhttp.send();";
str += "}";
str += "</script>";
Place this script just before the closing <head> tag.
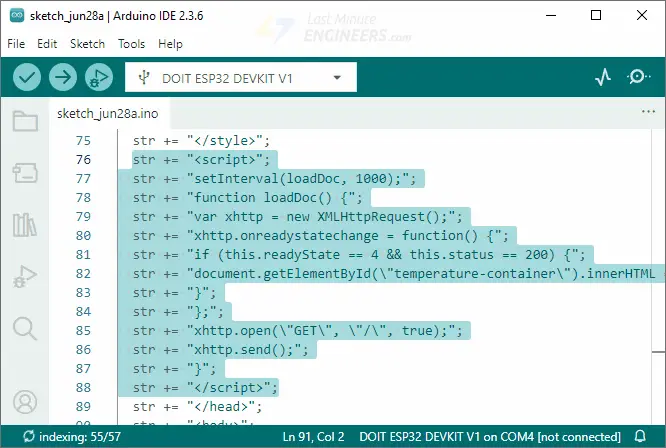
This AJAX code automatically sends a request to your ESP32 server every second, asking for the current temperature data. When the server responds with the temperature information, the code takes that data and inserts it into the specific <div> container on your webpage that has the ID “temperature-container”. This happens continuously in the background without refreshing the entire page, so your temperature display stays up to date while the rest of your webpage remains unchanged.
Example 4 – Controlling Physical Things with a Web Server
Let’s dive into our most exciting example yet! This time, we’re not just displaying information; we’re going to use our ESP32 to control actual physical things directly from a web page.
Project Overview
Our main goal for this project is to have the ESP32 control two LEDs over Wi-Fi. We’ll start by having the ESP32 set up a web server in Station (STA) mode, just like in previous examples. This server will serve a web page that you can open on your phone or computer. On this web page, you’ll see whether our LEDs are currently ON or OFF, and more importantly, you’ll find buttons to change their state! When you click a button on that web page, the ESP32 will respond by turning the LEDs on or off based on your action.
The Idea Behind Using an ESP32 Web Server to Control Things
You might be wondering, “Wait a minute—how can a web server, which just serves web pages, actually control physical things like LEDs?”
Well, it’s actually super simple and clever. We’re going to control these physical things by simply visiting a specific web address, also known as a URL.
Here’s how it works: When you type a URL into your web browser, your browser sends a message called an HTTP request to the web server. It’s then the web server’s job to understand what that request means and respond accordingly.
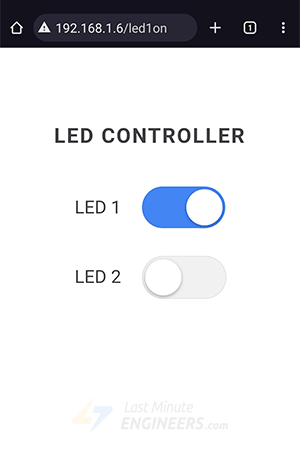
For example, imagine you type something like http://192.168.1.1/led1on into your browser’s address bar and hit enter. Your browser immediately sends an HTTP request to the ESP32. When the ESP32 receives this request, it’s smart enough to figure out that by seeing the /led1on part of the address, you want to turn the first LED on. So, it turns on the LED and then sends back a new webpage showing that the first LED is now on. Pretty straightforward, right? It’s like sending a secret code in a URL to tell the ESP32 what to do.
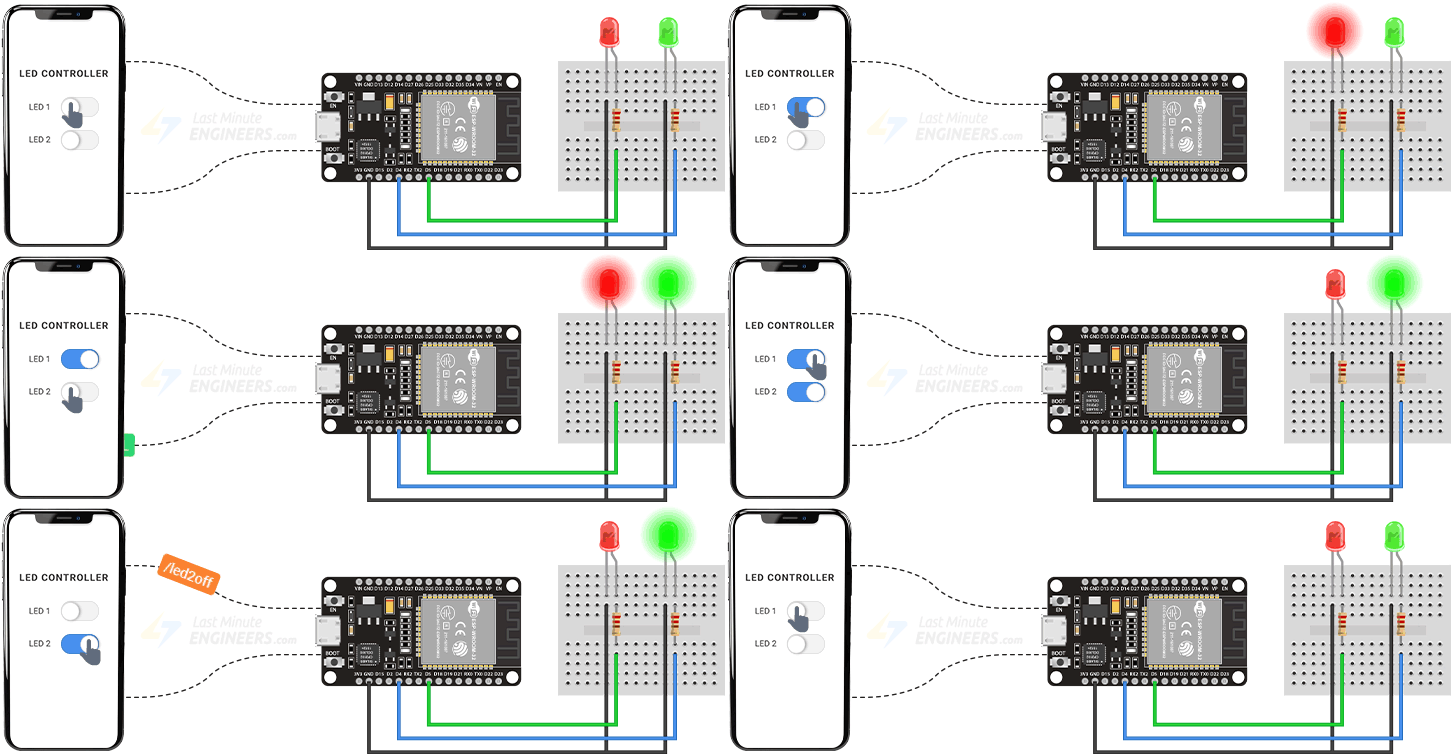
And it works not just for LEDs—you can use the same idea to control motors, relays, sensors, or even smart appliances at home, all through a simple web interface!
Wiring LEDs to an ESP32
To get started with our project, we first need to physically connect two LEDs to the ESP32.
To begin, carefully place your ESP32 board onto a breadboard. Make sure that each side of the ESP32 board sits on a different half of the breadboard.
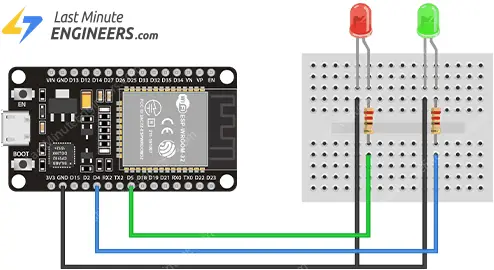
Next, take two LEDs and connect their longer legs (anodes) to GPIO 4 and GPIO 5 on the ESP32. Then, connect the shorter legs (cathodes) of the LEDs to one of the GND (ground) pins on the ESP32.
It’s super important to include a 220-ohm resistor in series with each LED. These resistors limit the current flowing through the LEDs and prevent them from burning out.
The diagram below shows exactly how to wire everything up:
Example Code
Copy the code below to your Arduino IDE. But before uploading the sketch to the ESP32, you’ll need to change two things in the code—your Wi-Fi network name (SSID) and your Wi-Fi password. This is how the ESP32 knows which network to connect to.
/*Put your SSID & Password*/
const char* ssid = "YourNetworkName";   // Enter SSID here
const char* password = "YourPassword";  //Enter Password here
Once you’ve updated the Wi-Fi details, go ahead and upload the sketch.
#include <WiFi.h>
#include <WebServer.h>

/*Put your SSID & Password*/
const char* ssid = "YourNetworkName";   // Enter SSID here
const char* password = "YourPassword";  //Enter Password here

WebServer server(80);

uint8_t LED1pin = 5;
bool LED1status = LOW;

uint8_t LED2pin = 4;
bool LED2status = LOW;

void setup() {
  Serial.begin(115200);
  delay(100);
  pinMode(LED1pin, OUTPUT);
  pinMode(LED2pin, OUTPUT);

  Serial.println("Connecting to ");
  Serial.println(ssid);

  //connect to your local wi-fi network
  WiFi.begin(ssid, password);

  //check wi-fi is connected to wi-fi network
  while (WiFi.status() != WL_CONNECTED) {
    delay(1000);
    Serial.print(".");
  }
  Serial.println("");
  Serial.println("WiFi connected..!");
  Serial.print("Got IP: ");
  Serial.println(WiFi.localIP());

  server.on("/", handle_OnConnect);
  server.on("/led1on", handle_led1on);
  server.on("/led1off", handle_led1off);
  server.on("/led2on", handle_led2on);
  server.on("/led2off", handle_led2off);
  server.onNotFound(handle_NotFound);

  server.begin();
  Serial.println("HTTP server started");
}

void loop() {
  server.handleClient();
}

void handle_OnConnect() {
  LED1status = LOW;
  LED2status = LOW;
  digitalWrite(LED1pin, LOW);
  digitalWrite(LED2pin, LOW);
  Serial.println("LED1 Status: OFF | LED2 Status: OFF");
  server.send(200, "text/html", createHTML());
}

void handle_led1on() {
  LED1status = HIGH;
  digitalWrite(LED1pin, HIGH);
  Serial.println("LED1 Status: ON");
  server.send(200, "text/html", createHTML());
}

void handle_led1off() {
  LED1status = LOW;
  digitalWrite(LED1pin, LOW);
  Serial.println("LED1 Status: OFF");
  server.send(200, "text/html", createHTML());
}

void handle_led2on() {
  LED2status = HIGH;
  digitalWrite(LED2pin, HIGH);
  Serial.println("LED2 Status: ON");
  server.send(200, "text/html", createHTML());
}

void handle_led2off() {
  LED2status = LOW;
  digitalWrite(LED2pin, LOW);
  Serial.println("LED2 Status: OFF");
  server.send(200, "text/html", createHTML());
}

void handle_NotFound() {
  server.send(404, "text/plain", "Not found");
}

String createHTML() {
  String str = "<!DOCTYPE html> <html>";
  str += "<head><meta name=\"viewport\" content=\"width=device-width, initial-scale=1.0, user-scalable=no\">";
  str += "<style>";
  str += "body {font-family: Arial, sans-serif; color: #444; text-align: center;}";
  str += ".title {font-size: 30px; font-weight: bold; letter-spacing: 2px; margin: 80px 0 55px;}";
  str += ".led-control {display: flex; align-items: center; justify-content: center; margin: 40px 0; gap: 30px;}";
  str += ".led-label {font-size: 26px;}";
  str += ".toggle-switch {width: 120px; height: 60px;}";
  str += ".slider {position: absolute; width: 120px; height: 60px; background-color: #f1f1f1; transition: .4s; border-radius: 60px; border: 1px solid #ddd;}";
  str += ".slider:before {content: ''; position: absolute; height: 52px; width: 52px; left: 4px; top: 4px; background-color: white; transition: .4s; border-radius: 50%; box-shadow: 0 2px 5px rgba(0, 0, 0, .3);}";
  str += ".slider.on {background-color: #4285f4; border: none;}";
  str += ".slider.on:before {transform: translateX(60px);}";
  str += "a {display: block; height: 100%; width: 100%; text-decoration: none;}";
  str += "</style>";
  str += "</head>";
  str += "<body>";
  str += "<h1 class=\"title\">LED CONTROLLER</h1>";

  // LED 1 Control
  str += "<div class=\"led-control\">";
  str += "<span class=\"led-label\">LED 1</span>";
  str += "<div class=\"toggle-switch\">";
  if (LED1status) {
    str += "<a href=\"/led1off\">";
    str += "<div class=\"slider on\"></div>";
    str += "</a>";
  } else {
    str += "<a href=\"/led1on\">";
    str += "<div class=\"slider\"></div>";
    str += "</a>";
  }
  str += "</div>";
  str += "</div>";

  // LED 2 Control
  str += "<div class=\"led-control\">";
  str += "<span class=\"led-label\">LED 2</span>";
  str += "<div class=\"toggle-switch\">";
  if (LED2status) {
    str += "<a href=\"/led2off\">";
    str += "<div class=\"slider on\"></div>";
    str += "</a>";
  } else {
    str += "<a href=\"/led2on\">";
    str += "<div class=\"slider\"></div>";
    str += "</a>";
  }
  str += "</div>";
  str += "</div>";

  str += "</body>";
  str += "</html>";
  return str;
}
Accessing the Web Server
After uploading the sketch, open the Serial Monitor and make sure the baud rate is set to 115200. Then press the EN (reset) button on your ESP32. If everything is working correctly, the ESP32 will connect to your Wi-Fi network and print out a message that says “WiFi connected..!” along with the IP address it received from your router. You’ll also see “HTTP server started” printed in the Serial Monitor.

Now, grab a device like your phone or laptop that’s connected to the same Wi-Fi network as your ESP32. Open a web browser (like Chrome or Firefox) and type in the IP address that showed up on the Serial Monitor. You should see a web page pop up! This page will show the current status of both LEDs, along with buttons to control them.
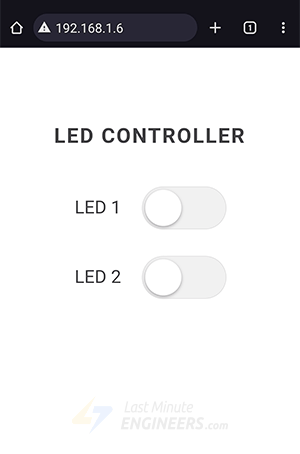
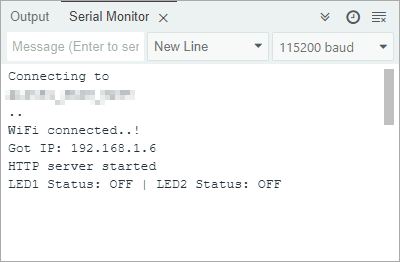
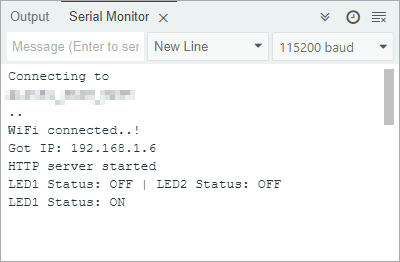
Now, while keeping an eye on the URL, click the button for LED1. As soon as you click it, your browser sends a request to the ESP32 using a special web address: /led1on. The ESP32 reads this, turns on LED1, and then sends back a new webpage showing that the LED1 is now ON. At the same time, the Serial Monitor will show “LED1 Status: ON”.

Go ahead and try clicking the button for LED2 as well and observe how it responds. You’ll see that you can control both LEDs directly from your browser, all in real time.
Now let’s go step by step through the code so you can understand how everything works—and later, you’ll be able to modify it for your own cool projects.
Code Explanation
This sketch is very similar to the previous one in terms of setting up the ESP32 as a web server in STA mode. But in this example, instead of just displaying data, we’re actually controlling LEDs through the web interface.
At the beginning of the code, we define two variables to store the pin numbers for the LEDs—GPIO 4 and GPIO 5—and two more variables to keep track of whether each LED is currently ON or OFF. These status variables help us know what the LED is doing and display the correct information on the web page.
uint8_t LED1pin = 5;
bool LED1status = LOW;

uint8_t LED2pin = 4;
bool LED2status = LOW;
In the setup() function, we configure both LED pins as OUTPUT.
pinMode(LED1pin, OUTPUT);
pinMode(LED2pin, OUTPUT);
Next, we tell our web server what to do when certain URLs are visited. We use the server.on() function for this. So, just like before, when you visit the main page (represented by /), the ESP32 will run a function called handle_OnConnect(). But now, we also set up a bunch of new rules! For example, if someone visits /led1on, the ESP32 will run a specific function (handle_led1on()) to turn LED1 on. Similarly, we have rules for turning LED1 off (/led1off), turning LED2 on (/led2on), and turning LED2 off (/led2off). This way, each unique URL triggers a specific action on our LEDs. And, of course, we still have a rule for server.onNotFound() to show a “Page Not Found” message if someone types in a wrong address.
server.on("/", handle_OnConnect);
server.on("/led1on", handle_led1on);
server.on("/led1off", handle_led1off);
server.on("/led2on", handle_led2on);
server.on("/led2off", handle_led2off);
server.onNotFound(handle_NotFound);
Let’s go over what these functions do.
The handle_OnConnect() function runs whenever you visit the main page of our web server (i.e., the ESP32’s IP address). Inside this function, we make sure that both LEDs are turned off by default. To do this, we first set their status variables to LOW and then use digitalWrite() to send the “off” signal to their physical pins. We also print a message to the Serial Monitor. Finally, we call server.send() to send back a web page showing the current status of the LEDs.
void handle_OnConnect() {
  LED1status = LOW;
  LED2status = LOW;
  digitalWrite(LED1pin, LOW);
  digitalWrite(LED2pin, LOW);
  Serial.println("LED1 Status: OFF | LED2 Status: OFF");
  server.send(200, "text/html", createHTML());
}
Similarly, we have separate functions for turning each LED on and off: handle_led1on(), handle_led1off(), handle_led2on(), and handle_led2off(). Each of these functions works in a similar way. First, they update the LED’s status variable. Then, they use digitalWrite() to send the appropriate signal to the physical LED pin to actually turn it on or off. Next, they print a message to the Serial Monitor so you can see the change happening. And finally, they send an updated web page back to your browser using server.send().
void handle_led1on() {
  LED1status = HIGH;
  digitalWrite(LED1pin, HIGH);
  Serial.println("LED1 Status: ON");
  server.send(200, "text/html", createHTML());
}

void handle_led1off() {
  LED1status = LOW;
  digitalWrite(LED1pin, LOW);
  Serial.println("LED1 Status: OFF");
  server.send(200, "text/html", createHTML());
}

void handle_led2on() {
  LED2status = HIGH;
  digitalWrite(LED2pin, HIGH);
  Serial.println("LED2 Status: ON");
  server.send(200, "text/html", createHTML());
}

void handle_led2off() {
  LED2status = LOW;
  digitalWrite(LED2pin, LOW);
  Serial.println("LED2 Status: OFF");
  server.send(200, "text/html", createHTML());
}
Now, let’s talk about the createHTML() function. This is a very important custom function because its job is to dynamically build the entire web page based on the current status of our LEDs, so the web page always reflects the actual LED states.
The basic structure of the HTML generated by this function is similar to our previous examples. We start with the essential tags like <!DOCTYPE html>, <html>, <head>, and <meta>.
String createHTML(){
String str = "<!DOCTYPE html> <html>\n";
str +="<head><meta name=\"viewport\" content=\"width=device-width, initial-scale=1.0, user-scalable=no\">\n";
After that, we include some CSS styling to make everything look nice. We set things like the font styles, the colors, how big the headings are, and even the design of our virtual toggle switches, including their size, shape, and how they animate when clicked.
str += "<style>";
str += "body {font-family: Arial, sans-serif; color: #444; text-align: center;}";
str += ".title {font-size: 30px; font-weight: bold; letter-spacing: 2px; margin: 80px 0 55px;}";
str += ".led-control {display: flex; align-items: center; justify-content: center; margin: 40px 0; gap: 30px;}";
str += ".led-label {font-size: 26px;}";
str += ".toggle-switch {width: 120px; height: 60px;}";
str += ".slider {position: absolute; width: 120px; height: 60px; background-color: #f1f1f1; transition: .4s; border-radius: 60px; border: 1px solid #ddd;}";
str += ".slider:before {content: ''; position: absolute; height: 52px; width: 52px; left: 4px; top: 4px; background-color: white; transition: .4s; border-radius: 50%; box-shadow: 0 2px 5px rgba(0, 0, 0, .3);}";
str += ".slider.on {background-color: #4285f4; border: none;}";
str += ".slider.on:before {transform: translateX(60px);}";
str += "a {display: block; height: 100%; width: 100%; text-decoration: none;}";
str += "</style>";
Now here’s the cool part. Inside the HTML, we use if statements to check the current status of each LED. For example, if LED1status is ON, we show a blue slider (styled as ON) that links to /led1off, when clicked, it will turn the LED off. If LED1status is OFF, we show a grey slider (styled as OFF) that links to /led1on, when clicked, it will turn the LED on. The same logic is used for LED2status. This way, the button on the page always matches the real-world state of each LED, and clicking it will toggle the LED’s state.
// LED 1 Control
str += "<div class=\"led-control\">";
str += "<span class=\"led-label\">LED 1</span>";
str += "<div class=\"toggle-switch\">";
if (LED1status) {
  str += "<a href=\"/led1off\">";
  str += "<div class=\"slider on\"></div>";
  str += "</a>";
} else {
  str += "<a href=\"/led1on\">";
  str += "<div class=\"slider\"></div>";
  str += "</a>";
}
str += "</div>";
str += "</div>";

// LED 2 Control
str += "<div class=\"led-control\">";
str += "<span class=\"led-label\">LED 2</span>";
str += "<div class=\"toggle-switch\">";
if (LED2status) {
  str += "<a href=\"/led2off\">";
  str += "<div class=\"slider on\"></div>";
  str += "</a>";
} else {
  str += "<a href=\"/led2on\">";
  str += "<div class=\"slider\"></div>";
  str += "</a>";
}
str += "</div>";
str += "</div>";
Finally, just like in all our other examples, the createHTML() function closes all the necessary HTML tags and returns the entire web page as a string. This string is then passed to the server.send() function, which sends it to your browser.
