
One of the coolest things about the DS18B20 temperature sensor is that you can connect many of them using just a single data wire. This is possible because each DS18B20 sensor has its own unique 64-bit address. This special address lets your microcontroller identify each sensor individually, even when they’re all connected to the same data wire.
This feature is super useful when you want to monitor temperatures in different locations—like different rooms in a house, sections of a greenhouse, or any large area. And the best part? You can do it all with just one data wire!
In this tutorial, you’ll learn how to set up and read temperatures from multiple DS18B20 sensors connected to the same wire.
Before we begin, you should understand the basics of how the DS18B20 one-wire temperature sensor works. If you’re new to this sensor or need a refresher, please check out the tutorial below:

Now that you’re ready, let’s start connecting the DS18B20 sensors to our Arduino!
Wiring Multiple DS18B20 Sensors to Arduino
Connecting multiple DS18B20 sensors to your Arduino is pretty straightforward.
Start by wiring all the sensors in parallel, which means all the VDD, GND, and signal pins from each sensor are connected together.
Next, connect the VDD wire to the 5V output on the Arduino, the GND wire to the Arduino’s ground pin, and the signal wire to digital pin 2 on the Arduino.
To keep the data communication stable, you’ll need to add a 4.7k ohm pull-up resistor between the signal line and the power line. Just a quick note—using the internal pull-up resistors on the Arduino won’t work in this case, so you have to use a real physical resistor.
Here’s a quick reference table for the pin connections:
| DS18B20 | Arduino | Notes | |
| VDD | 5V | – | |
| GND | GND | – | |
| DQ | 2 | pulled up by 4.7kΩ |

Library Installation
The 1-Wire® communication protocol used by the DS18B20 sensor is a bit complex, and writing all the code for it from scratch would take a lot of time. Luckily, there’s a special library called DallasTemperature that makes things much easier.
To install the library,
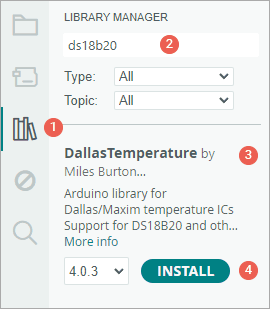
- First open your Arduino IDE program. Then click on the Library Manager icon on the left sidebar.
- Type “ds18b20” in the search box to filter your results.
- Look for the DallasTemperature Library by Miles Burton.
- Click the Install button to add it to your Arduino IDE.
To work properly, the DallasTemperature library needs to be paired with another library called OneWire.
To install the OneWire library:
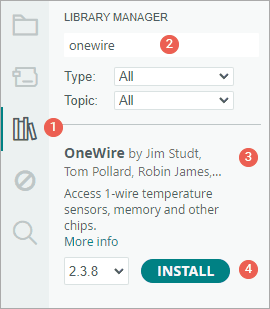
- Open the Library Manager again.
- In the search box, type “onewire“.
- Find the OneWire Library and click Install.
With both libraries installed, you’ll be ready to start working with your DS18B20 sensors!
Methods for Reading Multiple DS18B20 Sensors
When you have more than one DS18B20 sensor connected to the same data wire, there are two main methods you can use to read temperatures from each one.
- Reading by index – In this method, the library you’re using automatically gives each sensor an index number, based on the order they were found. You can use these index numbers to ask the Arduino to read the temperature from a specific sensor. This method is useful when you don’t need to know exactly which sensor is which physically, but just want to read all of them in the order they’re found.
- Reading by address – Each DS18B20 sensor has its own unique 64-bit address. With this method, you use these special addresses to communicate with each sensor directly, so you always know which sensor you’re getting the temperature from—no matter where it’s connected on the wire.
Let’s take a closer look at how each method works.
Method 1: Reading DS18B20 Sensors By Index
When we use the DallasTemperature library with the DS18B20 sensors, the first thing it does is scan the 1-Wire bus to find all the sensors connected to it. The library gives each one an index, starting from zero. Once each sensor has an index, we can easily read the temperature from any sensor just by referring to its index number.
The example sketch below shows how to set up an Arduino to find all connected DS18B20 sensors and then display their temperature readings.
#include <OneWire.h>
#include <DallasTemperature.h>
// Data wire is plugged into digital pin 2 on the Arduino
#define ONE_WIRE_BUS 2
// Setup a oneWire instance to communicate with any OneWire device
OneWire oneWire(ONE_WIRE_BUS);
// Pass oneWire reference to DallasTemperature library
DallasTemperature sensors(&oneWire);
int deviceCount = 0;
float tempC;
void setup(void) {
sensors.begin(); // Start up the library
Serial.begin(9600);
// locate devices on the bus
Serial.print("Locating devices...");
Serial.print("Found ");
deviceCount = sensors.getDeviceCount();
Serial.print(deviceCount, DEC);
Serial.println(" devices.");
Serial.println("");
}
void loop(void) {
// Send command to all the sensors for temperature conversion
sensors.requestTemperatures();
// Display temperature from each sensor
for (int i = 0; i < deviceCount; i++) {
Serial.print("Sensor ");
Serial.print(i + 1);
Serial.print(" : ");
tempC = sensors.getTempCByIndex(i);
Serial.print(tempC);
Serial.print("°C | ");
Serial.print(DallasTemperature::toFahrenheit(tempC));
Serial.println("°F");
}
Serial.println("");
delay(1000);
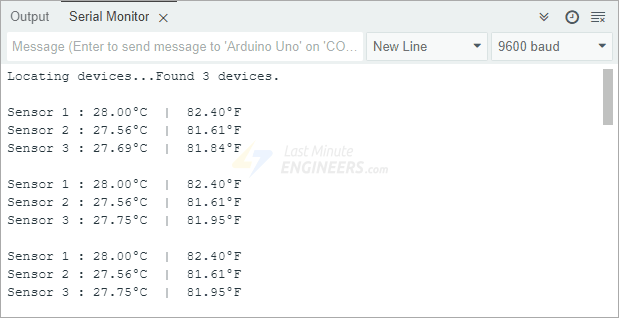
}After uploading the sketch to your Arduino, open the Serial Monitor and set the speed to 9600 baud. You’ll see the current temperature from each sensor shown in both Celsius (°C) and Fahrenheit (°F).
Code Explanation:
The sketch starts by including two important libraries: OneWire.h, which handles communication with devices that use the 1-Wire protocol, and DallasTemperature.h, which makes it easy to work specifically with DS18B20 sensors to get temperature readings.
#include <OneWire.h>
#include <DallasTemperature.h>
Next, we tell the Arduino which pin the sensors are connected to—in this case, digital pin 2.
#define ONE_WIRE_BUS 2To communicate with the sensors, we need to do two things. First, we create a OneWire object and tell it which pin the sensor is connected to. Second, we create a DallasTemperature object and pass it the reference to the OneWire object we just created.
OneWire oneWire(ONE_WIRE_BUS);
DallasTemperature sensors(&oneWire);
We also create two variables: deviceCount stores how many sensors are found on the bus, and tempC stores the temperature reading from each sensor.
int deviceCount = 0;
float tempC;
In the setup section, we first call the begin() function, which scans the bus to find all connected DS18B20 sensors. As the library finds each sensor, it assigns it an index number.
sensors.begin();Then, we use getDeviceCount() to find out how many sensors were discovered, and we print that number to the serial monitor.
Serial.print("Locating devices...");
Serial.print("Found ");
deviceCount = sensors.getDeviceCount();
Serial.print(deviceCount, DEC);
Serial.println(" devices.");
In the loop() section, we call sensors.requestTemperatures() function. This tells all the sensors on the wire to perform a temperature conversion.
sensors.requestTemperatures();Finally, we use a simple for loop to go through each sensor one by one. For each sensor, we get its temperature using getTempCByIndex(index) and print the temperature in both Celsius and Fahrenheit.
for (int i = 0; i < deviceCount; i++) {
  Serial.print("Sensor ");
  Serial.print(i + 1);
  Serial.print(" : ");
  tempC = sensors.getTempCByIndex(i);
  Serial.print(tempC);
  Serial.print("°C  |  ");
  Serial.print(DallasTemperature::toFahrenheit(tempC));
  Serial.println("°F");
}
After printing all the temperatures, we pause for a second before starting again.
Method 2: Reading DS18B20 Sensors by Address
Every DS18B20 temperature sensor has its own unique 64-bit address. This special address allows each sensor to be recognized individually, even when multiple sensors are connected to the same data wire.
In this example, we’ll use two sketches. First, we’ll use one sketch to find and write down the address of each sensor. Then, in a second sketch, we’ll use those addresses to read the temperature from each sensor individually.
Finding the Addresses of DS18B20s on a Bus
The first thing we need to do is discover the address of each sensor. Our sketch will search for all DS18B20 sensors connected to the data wire and print each one’s address to the Serial Monitor.
It’s a good idea to connect just one sensor at a time when doing this step. That way, you can easily keep track of which sensor has which address and even give each one a label or name later if you want.
#include <OneWire.h>
#include <DallasTemperature.h>

// Data wire is plugged into port 2 on the Arduino
#define ONE_WIRE_BUS 2

// Setup a oneWire instance to communicate with any OneWire devices
OneWire oneWire(ONE_WIRE_BUS);

// Pass our oneWire reference to Dallas Temperature.
DallasTemperature sensors(&oneWire);

// variable to hold device addresses
DeviceAddress Thermometer;

int deviceCount = 0;

void setup(void) {
  // start serial port
  Serial.begin(9600);

  // Start up the library
  sensors.begin();

  // locate devices on the bus
  Serial.println("Locating devices...");
  Serial.print("Found ");
  deviceCount = sensors.getDeviceCount();
  Serial.print(deviceCount, DEC);
  Serial.println(" devices.");
  Serial.println("");

  Serial.println("Printing addresses...");
  for (int i = 0; i < deviceCount; i++) {
    Serial.print("Sensor ");
    Serial.print(i + 1);
    Serial.print(" : ");
    sensors.getAddress(Thermometer, i);
    printAddress(Thermometer);
  }
}

void loop(void) {
}

void printAddress(DeviceAddress deviceAddress) {
  for (uint8_t i = 0; i < 8; i++) {
    Serial.print("0x");
    if (deviceAddress[i] < 0x10) Serial.print("0");
    Serial.print(deviceAddress[i], HEX);
    if (i < 7) Serial.print(", ");
  }
  Serial.println("");
}
After uploading the sketch to your Arduino, open the Serial Monitor. You’ll see the address of each connected sensor displayed.
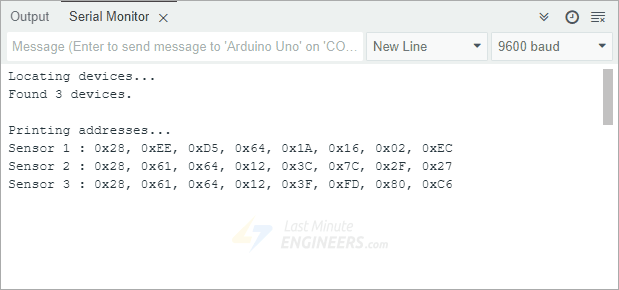
Note: Make sure to copy these addresses and save them somewhere, as we’ll need them for the next sketch.
Code Explanation:
We start by including two important libraries needed to communicate with the DS18B20 sensors. Then we specify which digital pin on the Arduino is connected to the data wire—in this case, pin 2. We also create a special variable that will store the address of each sensor we find.
In the setup() section of the code, we start serial communication, initialize the sensor library, and ask it to search for any connected sensors. Once it finds them, it counts how many there are and displays that number. Then, the program goes through each sensor one by one and shows its unique address.
The printAddress() function is used to format the address so it shows up nicely on the Serial Monitor.
Reading DS18B20s By Address
Now that we’ve discovered and saved the addresses of each sensor, we can use them to read the temperature from each one individually. Before running this second sketch, make sure to replace the example addresses in the code with the ones you found from your own sensors in the previous step.
#include <OneWire.h>
#include <DallasTemperature.h>
// Data wire is plugged into port 2 on the Arduino
#define ONE_WIRE_BUS 2
// Setup a oneWire instance to communicate with any OneWire devices
OneWire oneWire(ONE_WIRE_BUS);
// Pass our oneWire reference to Dallas Temperature.
DallasTemperature sensors(&oneWire);
// Addresses of 3 DS18B20s
uint8_t sensor1[8] = { 0x28, 0xEE, 0xD5, 0x64, 0x1A, 0x16, 0x02, 0xEC };
uint8_t sensor2[8] = { 0x28, 0x61, 0x64, 0x12, 0x3C, 0x7C, 0x2F, 0x27 };
uint8_t sensor3[8] = { 0x28, 0x61, 0x64, 0x12, 0x3F, 0xFD, 0x80, 0xC6 };
void setup(void) {
Serial.begin(9600);
sensors.begin();
}
void loop(void) {
sensors.requestTemperatures();
Serial.print("Sensor 1: ");
printTemperature(sensor1);
Serial.print("Sensor 2: ");
printTemperature(sensor2);
Serial.print("Sensor 3: ");
printTemperature(sensor3);
Serial.println();
delay(1000);
}
void printTemperature(DeviceAddress deviceAddress) {
float tempC = sensors.getTempC(deviceAddress);
Serial.print(tempC);
Serial.print("°C | ");
Serial.print(DallasTemperature::toFahrenheit(tempC));
Serial.println("°F");
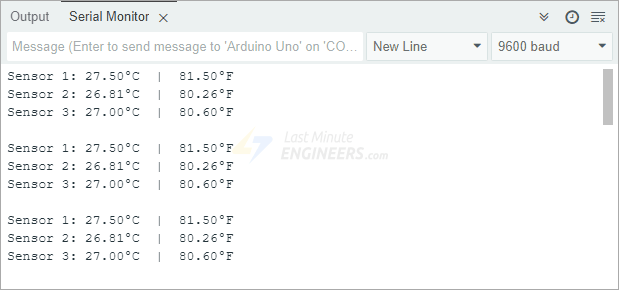
}After uploading this sketch to your Arduino, you’ll see the temperatures from all your sensors displayed clearly on the Serial Monitor. Since you’re using their unique addresses, you’ll always know exactly which sensor is reporting which temperature.
Code Explanation:
Just as before, we include the necessary libraries, specify which pin the data wire is connected to, and create an object from the DallasTemperature library.
#include <OneWire.h>
#include <DallasTemperature.h>

// Data wire is plugged into port 2 on the Arduino
#define ONE_WIRE_BUS 2

// Setup a oneWire instance to communicate with any OneWire devices
OneWire oneWire(ONE_WIRE_BUS);

// Pass our oneWire reference to Dallas Temperature.
DallasTemperature sensors(&oneWire);
Next, we enter the addresses of the sensors using the same format that was displayed earlier. These addresses are stored in special arrays—one for each sensor.
uint8_t sensor1[8] = { 0x28, 0xEE, 0xD5, 0x64, 0x1A, 0x16, 0x02, 0xEC };
uint8_t sensor2[8] = { 0x28, 0x61, 0x64, 0x12, 0x3C, 0x7C, 0x2F, 0x27 };
uint8_t sensor3[8] = { 0x28, 0x61, 0x64, 0x12, 0x3F, 0xFD, 0x80, 0xC6 };
In the setup() section, we call the begin() function, which scans the bus to find all connected DS18B20 sensors.
void setup(void) {
  Serial.begin(9600);
  sensors.begin();
}
In the loop() section, we tell all sensors to perform a temperature conversion using the requestTemperatures() function. Then we go through each sensor, one at a time, and use a custom function called printTemperature(deviceAddress) to display the temperature of the sensor whose deviceAddress is provided as a parameter.
void loop(void) {
  sensors.requestTemperatures();

  Serial.print("Sensor 1: ");
  printTemperature(sensor1);

  Serial.print("Sensor 2: ");
  printTemperature(sensor2);

  Serial.print("Sensor 3: ");
  printTemperature(sensor3);

  Serial.println();
  delay(1000);
}
The printTemperature() function simply calls the getTempC(deviceAddress) function to get the temperature from a specific sensor using its address, then displays the temperature in both Celsius and Fahrenheit.
void printTemperature(DeviceAddress deviceAddress) {
  float tempC = sensors.getTempC(deviceAddress);
  Serial.print(tempC);
  Serial.print("°C  |  ");
  Serial.print(DallasTemperature::toFahrenheit(tempC));
  Serial.println("°F");
}