
When you hear the term “smart garden,” one of the first things that might come to mind is a setup that automatically keeps your plants healthy—measuring how dry the soil is and watering plants only when they need it. No more guessing, no more soggy roots, and no more thirsty plants!
With the help of a simple Soil Moisture Sensor, you can build a system that knows exactly when your garden needs water and takes care of it. Whether you’re just curious about automation or planning to build a complete smart irrigation system, learning how to hook up and use a soil moisture sensor with Arduino is a great place to start.
In this tutorial, we’ll guide you through everything you need to know—from wiring to reading sensor data—so you can start building your own plant-friendly tech today.
Hardware Overview
A soil moisture sensor consists of two main parts: the sensor probes and the LM393 comparator module.
The Probe
The sensor has two large, exposed metal pads that function as probes. You stick these probes into the soil to measure moisture.

These probes work as a variable resistor, which means their resistance changes depending on how wet or dry the soil is. When the soil is wet, the resistance is lower. When the soil is dry, the resistance is higher.
The LM393 Comparator Module
Along with the probes, the sensor includes an LM393 comparator module that provides both digital and analog outputs.

The analog output (AO pin) comes directly from the changing resistance of the probes. The wetter the soil, the lower the resistance and the lower the signal at this pin.
This analog signal also goes to the LM393 comparator, which compares it to a reference voltage set by a potentiometer on the module.
- If the soil is drier than the set level, the comparator gives a HIGH digital output signal at the digital pin (DO).
- If the soil is wetter than the set level, it outputs a LOW digital signal.
This digital output can be used to trigger actions—like turning on a relay to water plants when the soil gets too dry.
You can change the moisture level threshold by turning the potentiometer. Turn it clockwise to increase the threshold (requiring drier soil to trigger) and counterclockwise to decrease the threshold (triggering when the soil is less dry).

The module also has two indicator LEDs:
- The Power LED lights up when the module receives power
- The Status LED turns on when the moisture level goes above the threshold
How Does a Soil Moisture Sensor Work?
The soil moisture sensor measures how much water is in the soil by checking the electrical resistance between the two metal probes placed in the soil.
When the sensor is powered (through its VCC and GND pins), a small electric voltage is applied to these probes.
- In dry soil: The soil has high resistance, making it difficult for electricity to flow between the probes.
- In wet soil: The soil contains more water, which helps electricity flow more easily. This means the soil has low resistance, and more current can flow between the probes.

The sensor detects this change in resistance and converts it into an electrical signal (voltage).
The module processes this signal in two ways:
Analog Output (AO pin): It provides a continuous voltage that corresponds to the moisture level. You can connect this to a microcontroller like Arduino to get a detailed reading of how wet or dry the soil is.
Digital Output (DO pin): The module compares the analog output to the threshold set by the potentiometer. If the soil moisture is lower (dry) than the threshold, the module’s digital output (DO) goes HIGH. If it’s higher (wet), it goes LOW.
Soil Moisture Sensor Pinout
The soil moisture sensor is extremely simple to use and only requires four pins to connect.

AO is the analog output pin. This pin gives a variable voltage that corresponds to the moisture level in the soil—the wetter the soil, the lower the output voltage. You connect this to an analog input pin on the Arduino (like A0).
DO is the digital output pin. This pin outputs LOW when the soil moisture exceeds the threshold value set by the potentiometer, and HIGH otherwise. You connect this to a digital input pin on the Arduino.
VCC pin provides power to the sensor. It’s best to power the sensor with 3.3V to 5V. Keep in mind that the analog output value will change based on the voltage you supply.
GND is the ground pin.
Experiment 1 – Measuring Soil Moisture using Analog Output (AO)
In our first experiment, we’re going to measure how much moisture is in the soil by reading the analog output from the sensor.
Wiring
Let’s start by connecting the soil moisture sensor to the Arduino.
First, connect the VCC pin on the sensor module to the 5V pin on the Arduino, and connect the GND pin on the sensor to one of the GND pins on the Arduino.
However, there’s an important thing to keep in mind. A common issue with these sensors is that they don’t last very long because they are always in contact with moisture. In addition, if the sensor is constantly powered while inserted in the soil, it tends to corrode more quickly.
To avoid this problem, it’s a good idea to power the sensor only when you need to take a reading. A simple way to do this is by connecting the sensor’s power pin to one of the Arduino’s digital output pins, and then turning that pin HIGH (on) or LOW (off) in your code as needed.
So instead of connecting the VCC pin directly to 5V, we’ll connect it to digital pin #7 on the Arduino. This way, the Arduino can control when the sensor is powered.
Finally, connect the AO pin of the sensor to the A0 analog input pin on the Arduino.
Here’s a quick reference table for the pin connections:
| Soil Moisture Sensor | Arduino | |
| VCC | 7 | |
| GND | GND | |
| AO | A0 |
Please refer to the image below to see the proper wiring setup.

Finding the threshold values
To estimate how moist or dry the soil is, you’ll first need to find out what sensor values you get when the soil is extremely dry and when it is fully soaked with water. These two points will help you set up proper threshold values for your project.
It’s important to understand that different types of soil can affect the readings. For example, sandy soil might give a different value than clay soil. Also, if the water you’re using contains minerals—like those from fertilizers—this can also change the sensor output. So your results might not be the same as someone else’s, and that’s totally okay.
To figure out the range of values, upload and run the sketch below on your Arduino.
// Sensor pins
#define sensorPower 7
#define sensorPin A0

void setup() {
  pinMode(sensorPower, OUTPUT);

  // Initially keep the sensor OFF
  digitalWrite(sensorPower, LOW);

  Serial.begin(9600);
}

void loop() {
  //get the reading from the function below and print it
  Serial.print("Analog output: ");
  Serial.println(readSensor());

  delay(1000);
}

//  This function returns the analog soil moisture measurement
int readSensor() {
  digitalWrite(sensorPower, HIGH);  // Turn the sensor ON
  delay(300);                       // Allow power to settle
  int val = analogRead(sensorPin);  // Read the analog value form sensor
  digitalWrite(sensorPower, LOW);   // Turn the sensor OFF
  return val;                       // Return analog moisture value
}
Once the sketch starts running, gently place the sensor into dry soil and write down the reading that appears in the Serial Monitor. Then, do the same after watering the soil until it’s completely wet. You might see a number around:
- 850 when the soil is dry
- 400 when the soil is fully saturated
These numbers give you a rough idea of the sensor’s behavior.

This part of the experiment may take a little trial and error. You might want to test it a few times with different amounts of water to make sure your readings are consistent. Once you’ve collected both dry and wet readings, you can use these numbers to set up your threshold values—this will help your Arduino decide when the soil needs water.
Arduino Code
In the next sketch, your Arduino will use the threshold values you found during calibration to figure out if the soil is too dry, too wet, or just right.
For this example, we will use the following threshold values based on the readings we obtained earlier:
- If the reading is less than 500, it means the soil is too wet.
- If the reading is between 500 and 750, it’s in the ideal range.
- If it’s more than 750, the soil is dry enough that it probably needs watering.
/* Change these values based on your calibration values */
#define soilWet 500 // Define max value we consider soil 'wet'
#define soilDry 750 // Define min value we consider soil 'dry'
// Sensor pins
#define sensorPower 7
#define sensorPin A0
void setup() {
pinMode(sensorPower, OUTPUT);
// Initially keep the sensor OFF
digitalWrite(sensorPower, LOW);
Serial.begin(9600);
}
void loop() {
//get the reading from the function below and print it
int moisture = readSensor();
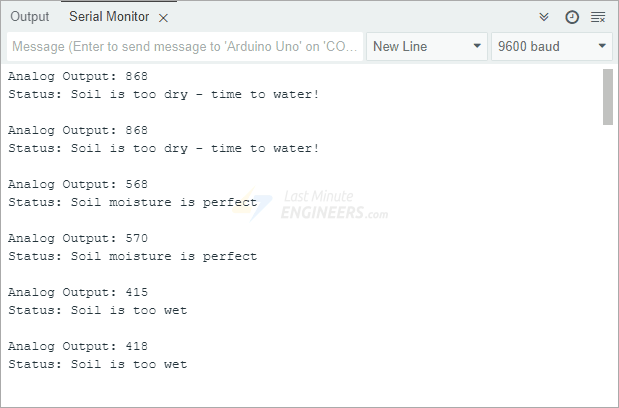
Serial.print("Analog Output: ");
Serial.println(moisture);
// Determine status of our soil
if (moisture < soilWet) {
Serial.println("Status: Soil is too wet");
} else if (moisture >= soilWet && moisture < soilDry) {
Serial.println("Status: Soil moisture is perfect");
} else {
Serial.println("Status: Soil is too dry - time to water!");
}
delay(1000); // Take a reading every second for testing
// Normally you should take reading perhaps once or twice a day
Serial.println();
}
// This function returns the analog soil moisture measurement
int readSensor() {
digitalWrite(sensorPower, HIGH); // Turn the sensor ON
delay(300); // Allow power to settle
int val = analogRead(sensorPin); // Read the analog value form sensor
digitalWrite(sensorPower, LOW); // Turn the sensor OFF
return val; // Return analog moisture value
}After uploading the sketch and running it, you should see what the current moisture level is and whether the soil needs water.
Experiment 2 – Measuring Soil Moisture using Digital Output (DO)
In our second experiment, we’ll use the digital output from the sensor to check whether the soil moisture level is within an acceptable range.
Wiring
We’ll use the same circuit setup from the previous experiment. All you need to do is disconnect the wire going to the analog input pin (A0), and instead connect the DO (digital output) pin on the sensor module to digital pin 8 on the Arduino.
Here’s a quick reference table for the pin connections:
| Soil Moisture Sensor | Arduino | |
| VCC | 7 | |
| GND | GND | |
| DO | 8 |
Please refer to the image below to see the proper wiring setup.

Setting the threshold
The soil moisture sensor module has a small potentiometer. This lets you set the moisture level at which the module switches its digital output. When the moisture in the soil exceeds the threshold you’ve set, the module’s status LED will turn on, and the digital output will go LOW.

To set this up, insert the sensor into the soil when the plant is at the point where it needs watering. Then, slowly turn the potentiometer clockwise until the status LED turns on. After that, turn the knob slightly counterclockwise until the LED just turns off.
That’s it—your module is now calibrated and ready to use based on your chosen moisture level.
Arduino Code
Now upload the sketch to your Arduino. This program checks whether the soil is dry or not using the sensor’s digital output.
// Sensor pins
#define sensorPower 7
#define sensorPin 8
void setup() {
pinMode(sensorPower, OUTPUT);
// Initially keep the sensor OFF
digitalWrite(sensorPower, LOW);
Serial.begin(9600);
}
void loop() {
//get the reading from the function below and print it
int val = readSensor();
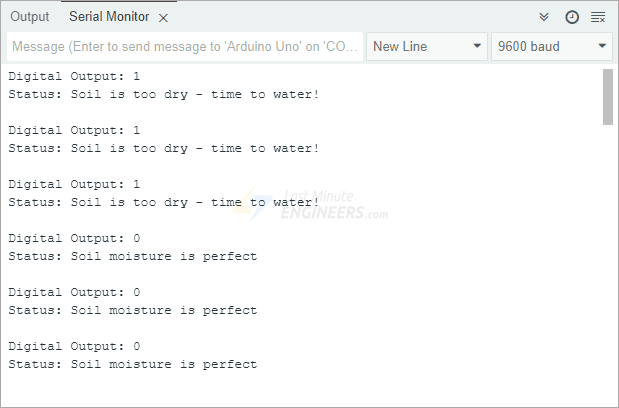
Serial.print("Digital Output: ");
Serial.println(val);
// Determine status of our soil moisture situation
if (val) {
Serial.println("Status: Soil is too dry - time to water!");
} else {
Serial.println("Status: Soil moisture is perfect");
}
delay(1000); // Take a reading every second for testing
// Normally you shoul take reading perhaps every 12 hours
Serial.println();
}
// This function returns the analog soil moisture measurement
int readSensor() {
digitalWrite(sensorPower, HIGH); // Turn the sensor ON
delay(300); // Allow power to settle
int val = digitalRead(sensorPin); // Read the analog value form sensor
digitalWrite(sensorPower, LOW); // Turn the sensor OFF
return val; // Return analog moisture value
}Once the sketch is running, the Arduino will read the digital signal from the sensor and print the result to the Serial Monitor.
The sensor takes a reading once every second for testing purposes. In a real project, you might want to take readings less often—perhaps every 12 hours or once a day—to conserve power and reduce wear on the sensor.